33748 326
Analytics 17 min read September 15, 2020

How To Track Buttons With Google Tag Manager

How To Track Buttons With Google Tag Manager The Easy Way
Евгения Сидорчук
Axel Kuehnle
If you are new to Google Tag Manager and Google Analytics, tracking button clicks can easily become overwhelming. On the other side, you want to measure user behaviors and how well your website is performing. Here is the easy way to track buttons with Google Tag Manager.
To get started, let's look at the components you need:
1
Button: the button defines where and what kind of clicks you measure. For example, a form submission, a site-wide call to action in your website header, or even a cookie banner.
2
Google Tag Manager: Google Tag Manager is your middle layer between the buttons and your dashboard. With Google Tag Manager, you define how your buttons will be measured.
3
Google Analytics: this is your final dashboard. Here you will track the data you want. For example, how many people clicked your button and on what site they clicked your button.
At this point, you should have successfully installed and integrated Google Analytics and Google Tag Manager. You should also be able to make changes to your website.
Events in Google Analytics
The best way to track button clicks is through Events. You can set-up events with Google Tag Manager, which is also the method described in this guide.

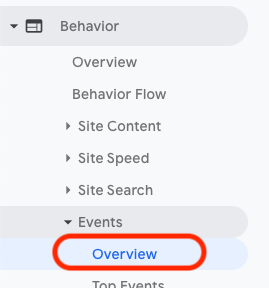
Go into your Google Analytics dashboard. Then click on Behavior to see data for events created in Google Tag Manager.
You may not see any data if you never created events before. For this tutorial, we will use the website https://mindmonia.com/. In our case, we already set-up events and gathered valuable data. For instance, the event PDF Download that measures how many people downloaded PDFs in a selected date range.
Once you successfully set-up button tracking events with Google Tag Manager, you will see event data in your Google Analytics account coming in.
Which Google Analytics Attribution Model To Choose
Button tracking set-up with Google Tag Manager
There are many reasons why you want to track buttons. You can categorize most of them in two buckets:
Notably, there are different ways to get that kind of data into Google Analytics. You could define triggers in different ways in Google Tag Manager, for some use cases, you could create goals instead of events, or even use an alternative to Google Tag Manager.

This guide will show you how to track button clicks using Google Analytics and Google Tag Manager.
Tracking Standalone Buttons
This kind of tracking is suitable for scenarios where the user simply clicks on a button without submitting any personal information. For example a call-to-action button in your header to send users to a landing page.
These buttons are easily trackable in Google Analytics, using Google Tag Manager. Tracking this, will give you great insights into your user behaviors, like your main buttons and pages that send traffic to your landing page.

Google Tag Manager set-up
To track standalone buttons, follow these four steps:
#1 ID assignment via website
How you assign a unique identifier (ID) for the button(s) you want to track works different for every website. You need to figure out with what tool, for example, a Wordpress page builder, your button was created, or if it was programmed manually.

The button(s) you want to track must have a unique ID.

Let's say you have five buttons on your entire website. All buttons have the ID id="button". However, you just want to track one of the buttons with Google Tag Manager. In this example, you should rename one of the five buttons to a different ID. For example id="header-button".

You can check the ID of your button using your browser. It is easiest with Google Chrome. Just right-click on your website. Select Inspect, and click on the icon, marked in the screenshot, and hover over your button. You should then be able to see the ID of your button.

If you can't find an ID, that means that the button doesn't have one yet. If you can find an ID make sure it is unique to the button you want to track.
#2 Variable
Now that you know the ID of your button, it's time to create a variable in Google Tag Manager. To do so, open your Google Tag Manager dashboard and click on Variables.
Select Configure and add a variable of the type Click Element.
#3 Trigger
After creating a variable, you need to assign a trigger to it. For that, open Triggers and hit New.
Give your trigger a meaningful name and configure it:

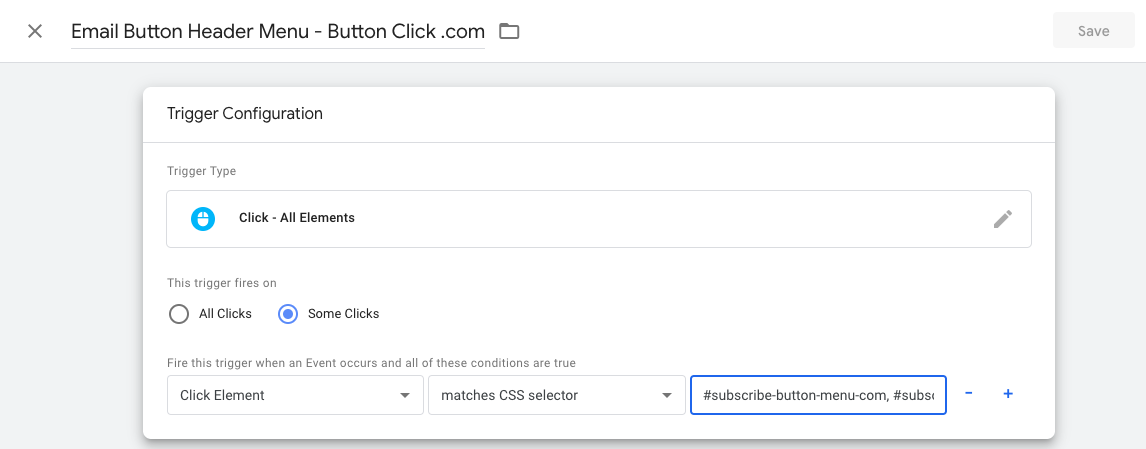
  • Trigger type: Click - All Elements
  • Trigger fires on: Some Clicks
  • Condition: Click Element, matches CSS selector. Add your ID that you assigned to your button on your website with the syntax #ID, #ID* (for example #header-button, #header-button*)

Save your trigger.
#4 Tag
Next, open Tags and hit New.
Give your tag a meaningful name and configure the tag:

  • Tag type: Google Analytics: Universal Analytics
  • Track type: Event
  • Event Tracking Parameters: you can set these values as you like. Here are some best practices.
  • Category: this is the name, how you will see the event in Google Analytics. For example Header Button
  • Action: For example Button Click
  • Label: For example {{Page URL}}
  • Value: empty
  • Non-interaction hit: False

Google Analytics settings: add your Google Analytics account {{Google Analytics Settings}}. Leave Enable overriding settings in this tag unchecked.
  • Triggering: select your trigger from the previous step.
Save your tag.
How To Track 404 Errors With Google Analytics And Tag Manager
Use сase for tracking form submissions
The second bucket is for so-called Form Submissions. A form submission is when your visitors have to submit personal information, such as their email address. After users enter their data and hit submit, either a success pop up appears, or a new page loads.

A typical use case, for example, could be a newsletter subscription form that is on a page where the single purpose of the page is to convert users or a form that is placed within a blog post.
Tracking these buttons with Google Tag Manager makes it very easy to see in Google Analytics how often your forms were submitted and on what pages your forms were submitted.

Google Tag Manager set-up
To track form submission buttons follow these four steps:
#1 ID assignment via website
Even though you want to track button clicks, you technically track form submissions. Therefore, assign the ID to the entire form, not the button.

The form(s) you want to track must have a unique ID.

Let's say you have five forms on your entire website. All forms have the ID id="form". However, you just want to track one of the forms with Google Tag Manager. In this example, you should rename one of the five forms to a different ID. For example id="newsletter-form".

How you assign a unique identifier (ID) for the form(s) you want to track works different for every website. You need to figure out with what tool, for example, a Wordpress page builder, your form was created, or if it was programmed manually.

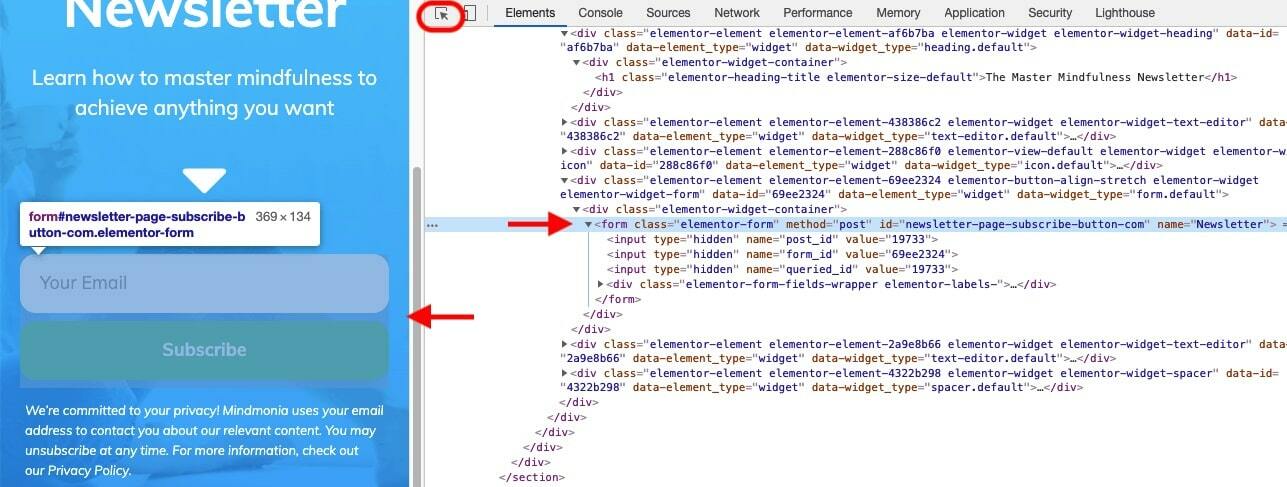
You can check the ID of your form using your browser. It is easiest with Google Chrome. Just right-click on your website. Select Inspect, and click on the icon, marked in the screenshot, and hover over your form. You should then be able to see the ID of your form.

If you can't find an ID, that means that the form doesn't have one. If you can find an ID make sure it is unique to the form you want to track.
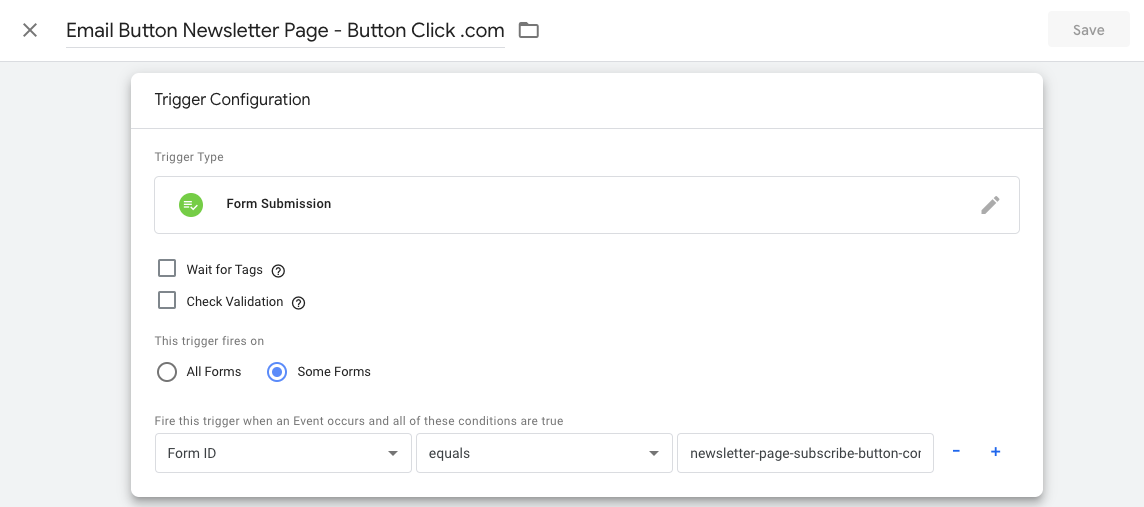
#2 Variable
Now that you know the ID of the form you want to track, it's time to take the necessary steps in the Google Tag Manager. To do so, open your Google Tag Manager dashboard and click on Variables.
Select Configure, and add the variable. This time, instead of Button Click, select Form ID.
#3 Trigger
After creating a variable, you need to assign a trigger to it. For that, open Triggers and hit New.
Give your trigger a meaningful name and configure it:

  • Trigger type: Form Submissionthis makes sure that you only measure button clicks that lead into form submissions and not button clicks that lead into error messages (for example if a user enters a wrong email address)
  • Checkboxes: leave them unchecked
  • Trigger fires on: Some Forms
  • Condition: Form ID, equals. Add your ID that you assigned to your form on your website with the syntax ID (for example header-button)
Save your trigger.
#4 Tag
Next, open Tags and hit New.

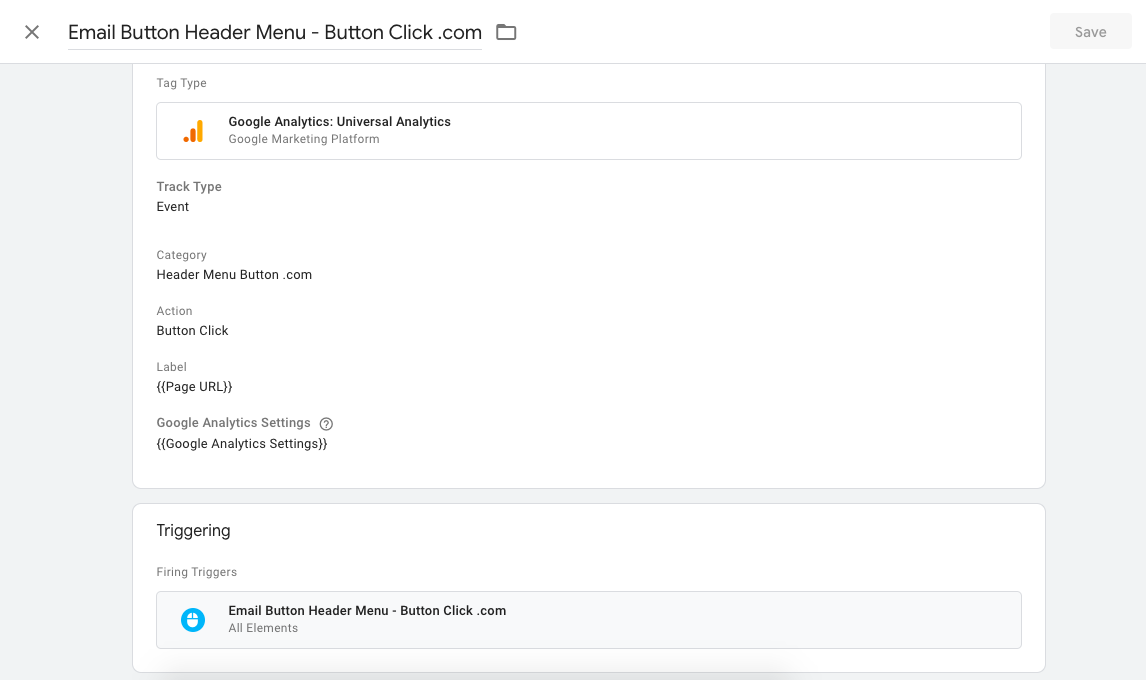
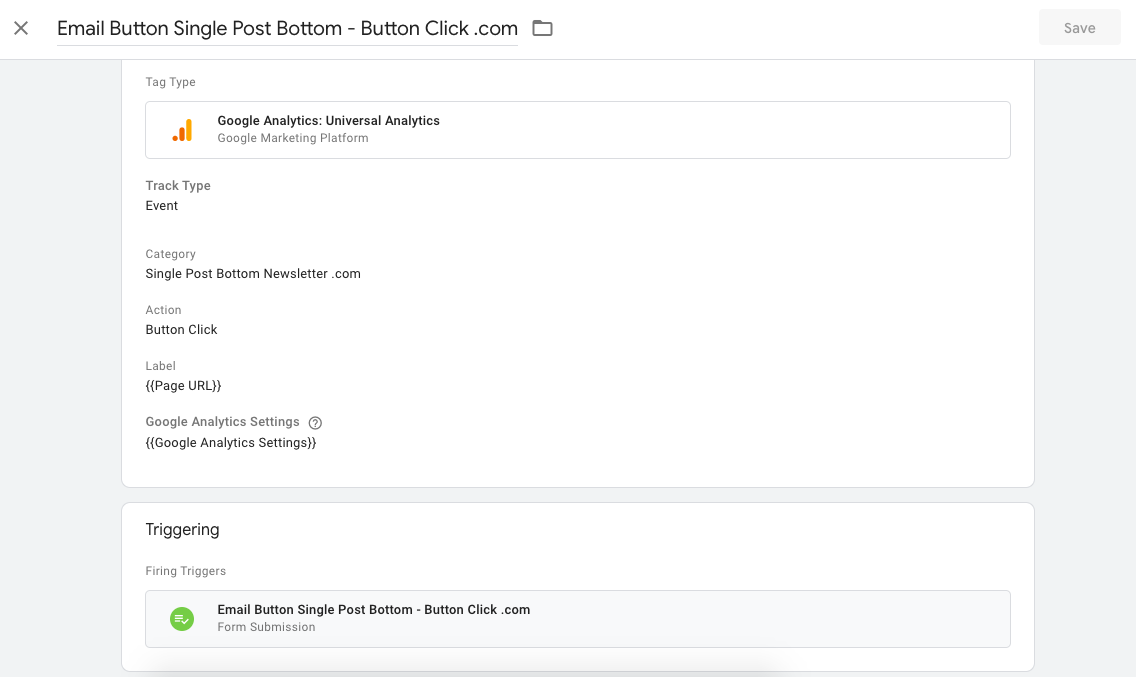
Give your tag a meaningful name and configure it. In our example, we went with the following:

  • Tag type: Google Analytics: Universal Analytics
  • Track type: Event
  • Event Tracking Parameters: you can set these values as you like. Here are some best practices.
    • Category: this is the name, how you will see the event in Google Analytics. For example Blog Form
    • Action: For example Button Click
    • Label: For example {{Page URL}}
    • Value: empty
    • Non-interaction hit: False
  • Google Analytics settings: add your Google Analytics account {{Google Analytics Settings}}. Leave Enable overriding settings in this tag unchecked
  • Triggering: select your trigger from the previous step.
Save your tag.
How to test a successful implementation
Now that you set-up everything step by step, you need to verify if your set-up works the way it should.

Google Tag Manager live preview
Before you publish the settings, enable the preview mode of Google Tag Manager. Then go to the website you want to track.
You should now see the Google Tag Manager preview box at the bottom of your screen. If not, there might be an issue with the way you integrated Google Tag Manager into your website - make sure to fix this before proceeding.
Then click the button you want to track. If your set-up works, you should now see your tag showing up under Tags Fired.

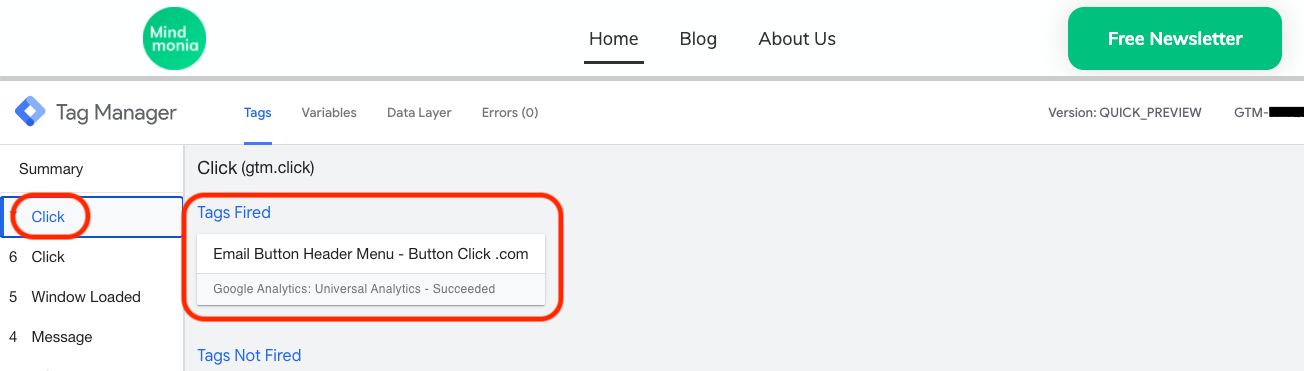
In this example, it's the newsletter header button. For your use case, it is a different button.
If not, make sure you select the Click where you clicked the button because Google Tag Manager tracks every click you make.

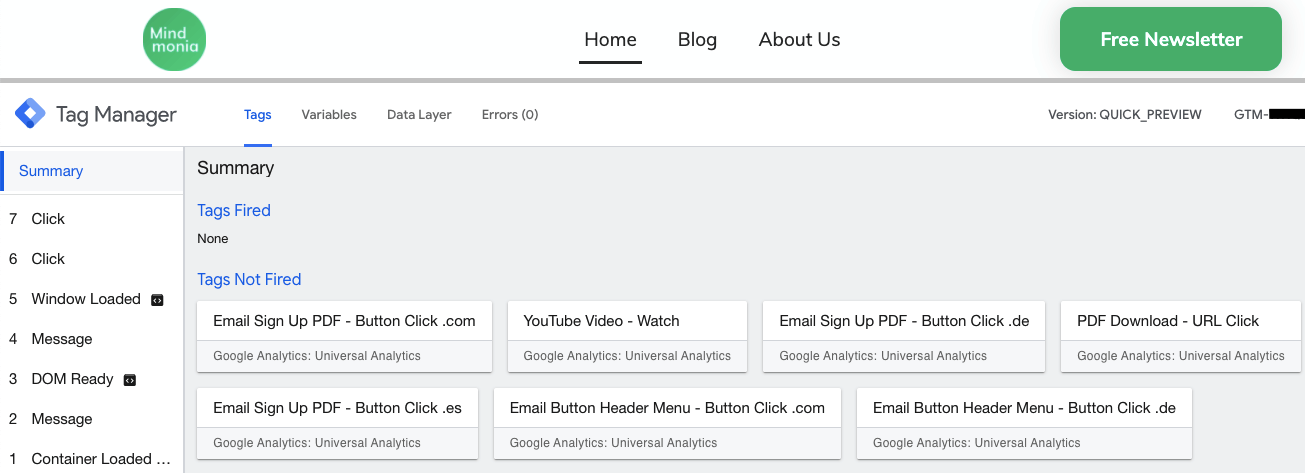
What if you still do not see your tag fired?

If you still have issues, make sure you selected the correct click, go to Tags not Fired (just below tags fired), and click on the tag that is supposed to fire.

Then scroll down to Firing Triggers.
Generally speaking, all filters under Firing Triggers must be checked with a green checkmark. Otherwise, the data is not sent to your Google Analytics dashboard.

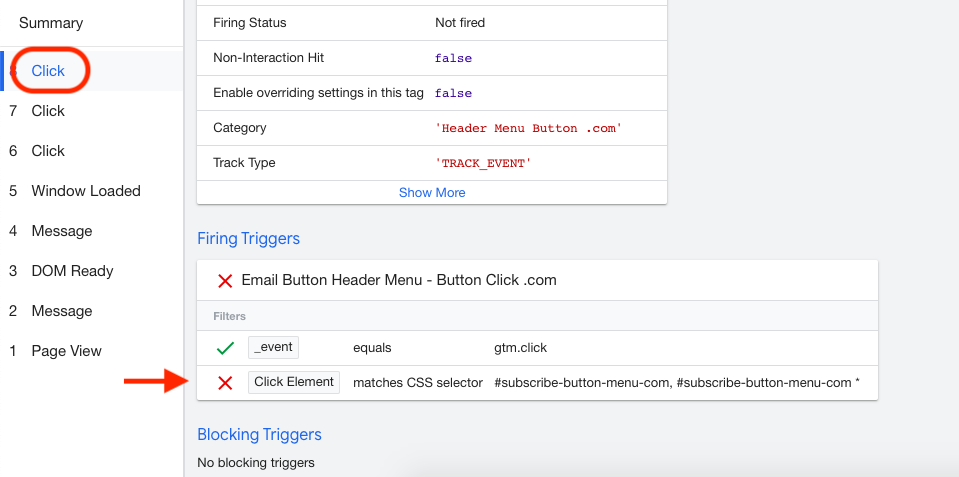
Reasons, why you might see one or several red crosses are different. Whatever the reason is that you see the red cross make sure to solve it. Think: "If I click the button I want to track on my website, why does this criteria not apply".

In our example, you can see that Google Tag Manager couldn't find the button ID. Hence, there is probably a mismatch between the ID assigned to the button on the website and the ID in Google Tag Manager trigger configuration.

Google Analytics realtime report
When you see your tag fired in your Google Tag Manager preview, check-in Google Analytics if you see your event. For this, you can use the realtime preview.

Just click the button while you are still in the Google Tag Manager preview. Then head over to Google Analytics and see if your event comes in.

If not, there might be an issue with your Google Tag Manager implementation - make sure to fix this before you go ahead.
What Is Google Tag Manager And Why Do You Need It
Publishing Google Tag Manager сhanges
Now you are ready to publish the Google Tag Manager changes and start tracking your button clicks. To do so, go back to your Google Tag Manager workspace and hit Submit.

Once you submitted your changes, do not forget to click Leave Preview Mode.
Summary
When you want to track buttons with Google Tag Manager to see the data in Google Analytics, you have to consider a couple of things.

Here is a quick summary of all steps:
Tracking clicks for standalone buttons:
1
Add a unique CSS ID to your button.
2
Create a Google Tag Manager trigger that fires when Click Element Matches CSS Selector and add your ID with the syntax #ID, #ID* (for example #header-button, #header-button*).
3
Add a Google Tag Manager tag of the type Event.
4
Test and publish.
Tracking Form submissions:
1
Add a unique CSS ID to your form.
2
Create a Google Tag Manager trigger that fires when Form ID "equals" and add your ID (for example form-button).
3
Add a Google Tag Manager tag of the type Event.
4
Test and publish.
You can repeat this process for every button individually or group buttons by assigning them the same ID. It usually makes sense to repeat the process and assign different IDs for pages where you have multiple buttons at the same time. That allows you to see them as different events even when they are on the same page.

Speed up your search marketing growth with Serpstat!

Keyword and backlink opportunities, competitors' online strategy, daily rankings and SEO-related issues.

A pack of tools for reducing your time on SEO tasks.

Get free 7-day trial

Rate the article on a five-point scale

The article has already been rated by 27 people on average 4.93 out of 5
Found an error? Select it and press Ctrl + Enter to tell us

Discover More SEO Tools

Serp Crawling

Scrape Google SERP and analyze

Connector With Looker Studio

Connect to Looker Studio and create reports with data visualization

Bulk Keyword Analysis

Revolutionize your keyword research process with our bulk keyword checker

Keyword Difficulty Tool

Stay ahead of the competition and dominate your niche with our keywords difficulty tool

Share this article with your friends

Are you sure?

Introducing Serpstat

Find out about the main features of the service in a convenient way for you!

Please send a request, and our specialist will offer you education options: a personal demonstration, a trial period, or materials for self-study and increasing expertise — everything for a comfortable start to work with Serpstat.

Name

Email

Phone

We are glad of your comment
I agree to Serpstat`s Privacy Policy.

Thank you, we have saved your new mailing settings.

Report a bug

Cancel
Open support chat
mail pocket flipboard Messenger telegramm