Start Exploring Keyword Ideas

Use Serpstat to find the best keywords for your website

How-to October 8, 2019  |  8600   |  10 min read  – Read later

What is Google Tag Manager and why do you need it

Google Tag Manager is a system for managing tags which are added to track and analyze the behavior of visitors to a resource. Such statistics help to identify and eliminate project bottlenecks.

What is Google Tag Manager

Google Tag Manager is designed to simplify and increase the productivity of working with tags which are small pieces of code that track the behavior of website visitors. Thanks to their use, one can objectively evaluate how successfully the website solves the users' tasks, the degree of effectiveness of the advertising campaign, and the number of conversion actions.

Tags that are used to collect analytic information are different from standard HTML tags such as <body>, <div> or <p>. In Google Tag Manager (GTM for short), tags are short HTML codes to simplify the integration of services and products on a project. For example, the Google Analytics tracking code.

Thanks to GTM, you don't need to add such tags to the resource program code. They can be configured and published in the Tag Manager interface without involving programmers for this purpose.
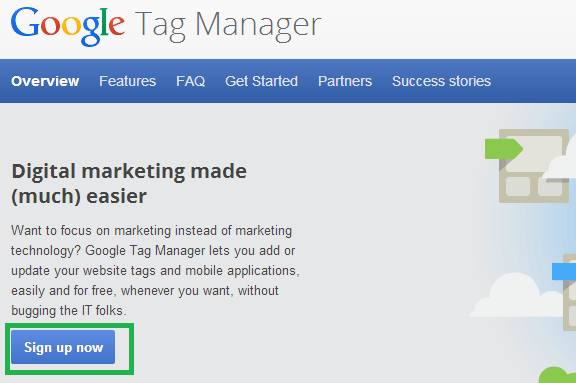
Google tag manager
Errors that happen when manually installing tags can slow down the loading of a website and cause other operational problems. It also distorts data for analytics and can lead to incorrect business decisions. In addition, for manual installation of tags, it is normally required to involve a programmer with hourly pay.

GTM allows you to streamline work processes and protect yourself from possible errors. GTM is used to add such tags as:

  • search engine tracking codes;
  • remarketing codes for paid search and targeted campaigns on social media;
  • tracking views of specific pages or content;
  • pressing any buttons;
  • scrolling;
  • submitting forms;
  • participating in Google surveys about website visitor satisfaction;
  • tracking clicks on external and internal links;
  • complex actions, for example, adding or removing certain products to the basket and many more.

The tool allows you to add more than 50 ready-made options for information and commercial projects as well as use your own custom tags:
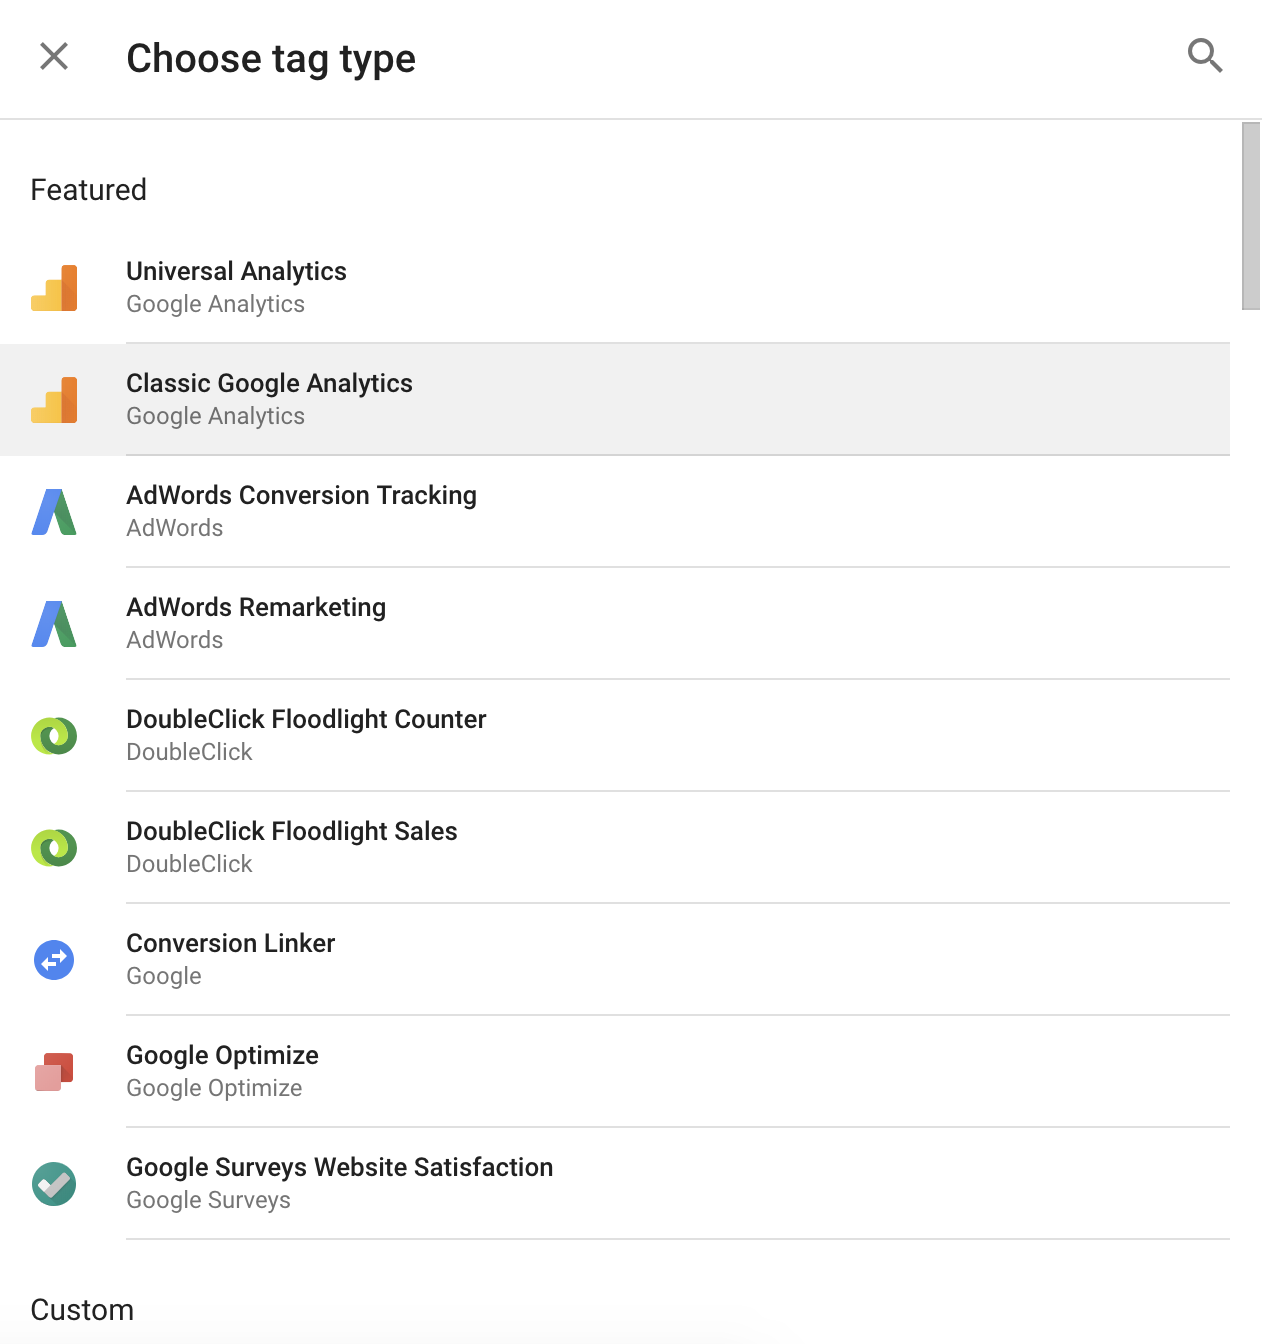
Tag Types in Google Tag Manager

Google Tag Manager: training before use

At the beginning of mastering GTM, it is worth considering a range of important points:

  • define which employees will manage your account. In case a certain specialist resigns, make sure there is another employee with access to the system in the company;


  • when working with multiple domains, it is desirable to create separate containers for each of them. However, for visually identical websites and tag sets, it is preferable to use one common container;


  • define which information you need to receive, analyze existing tags and make a list of new ones. To track actions performed on unique landing pages, standard tags that can be added to the container using GTM will be enough.

    For example, after a user places an order, a thank-you page is displayed at site.com/successful-order.html. In this case, you can track conversions using a tag that is activated when you go to the specified page.

    For tags that are activated in complex scenarios, for example, tracking the number of products added to the basket from the "Popular Products" block, more fine-tuning through the data layer will be required. This is an additional code that transfers information from the resource to tags during specific user actions, for example, pressing buttons, viewing certain content, scrolling, etc.

Google Tag Manager: installation step by step

Creating an account and a container

1
You should start by creating an account in the service:
Sign up for Google Tag Manager
2
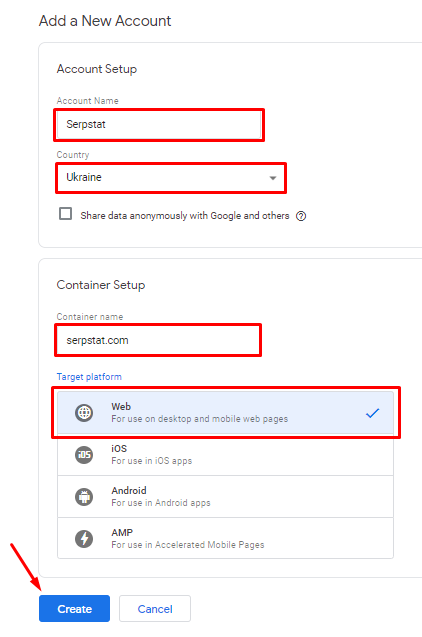
You must specify the name of the account and the country where the resource works. It is also necessary to enter the container parameters: Name and Type for a website, AMP pages or mobile applications:
Create a container in GTM
3
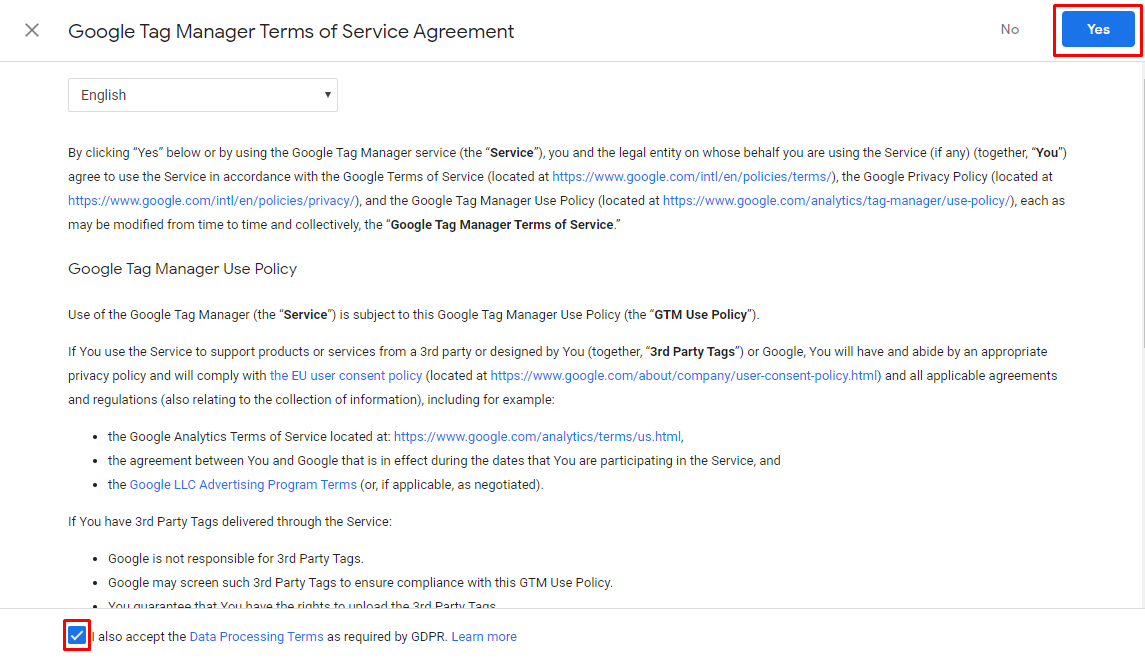
Next, you must accept the GTM Terms of Service Agreement:
Google Tag Manager Terms of Service
4
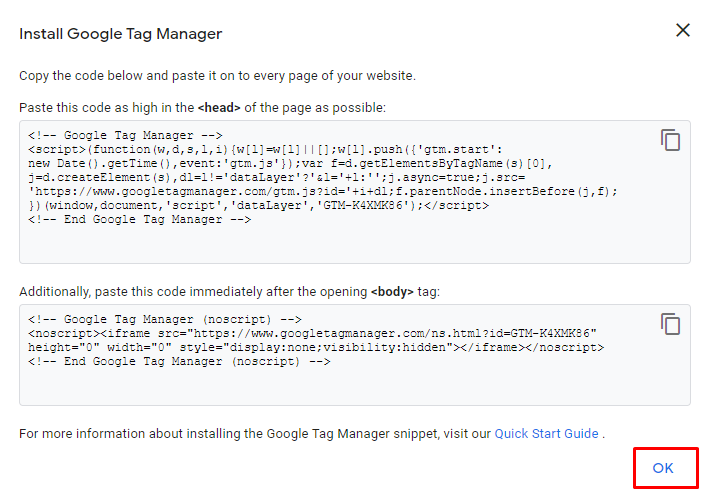
Then two code fragments will be generated; one needs to be added to all HTML pages of the project after the opening <head> tag, and the second one at the beginning of the <body> section:
Install Google Tag Manager
5
Then, for the correct service operation, it is advisable to delete all posted search engine tracking codes on the project and transfer them to the Tag Manager container. You'll also need to add the Google Analytics tag (Universal Analytics).

How to add the Google Universal Analytics tag

Before adding the tracking tag, create a variable that will be used to store the Google Analytics ID. Let's go to the "Variables" section for this purpose:
Variables in Google Tag Manager
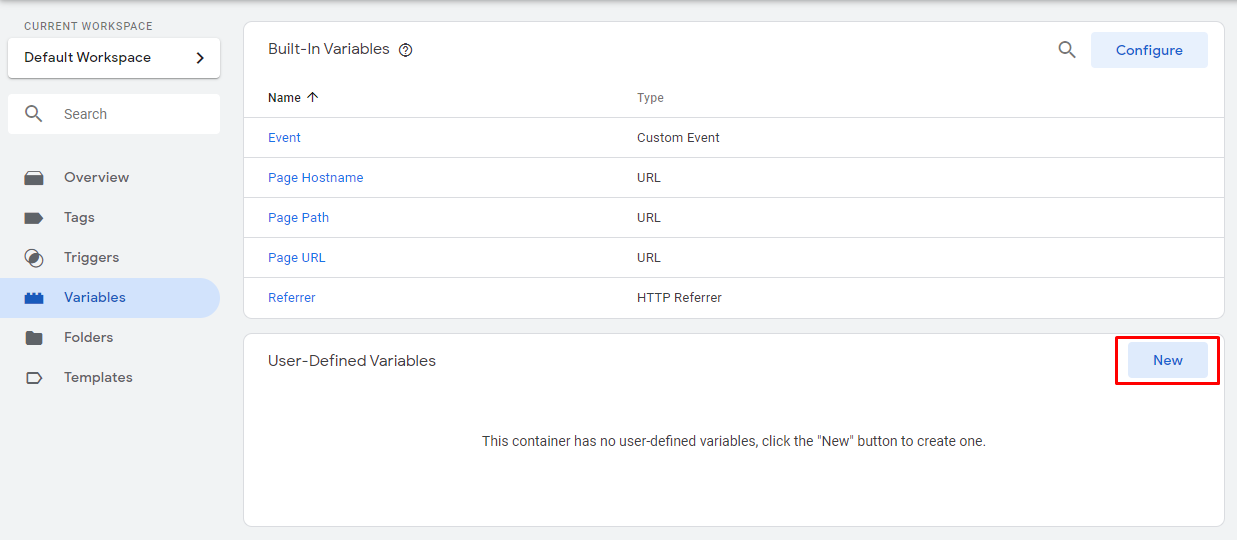
Choose "New":
Creating a GTM Variable
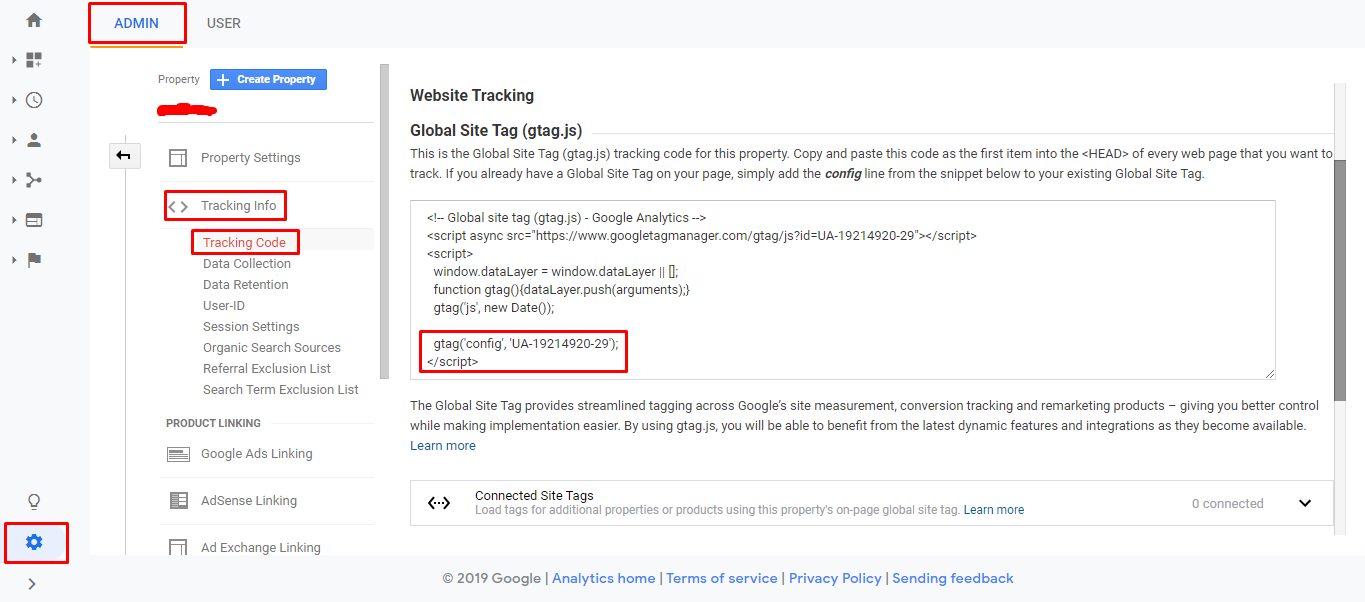
Then we need the identifier number from Google Analytics which can be copied in the settings by going to the "Admin" -> "Tracking info" -> "Tracking Code" section:
Google Analytics Tracking Code
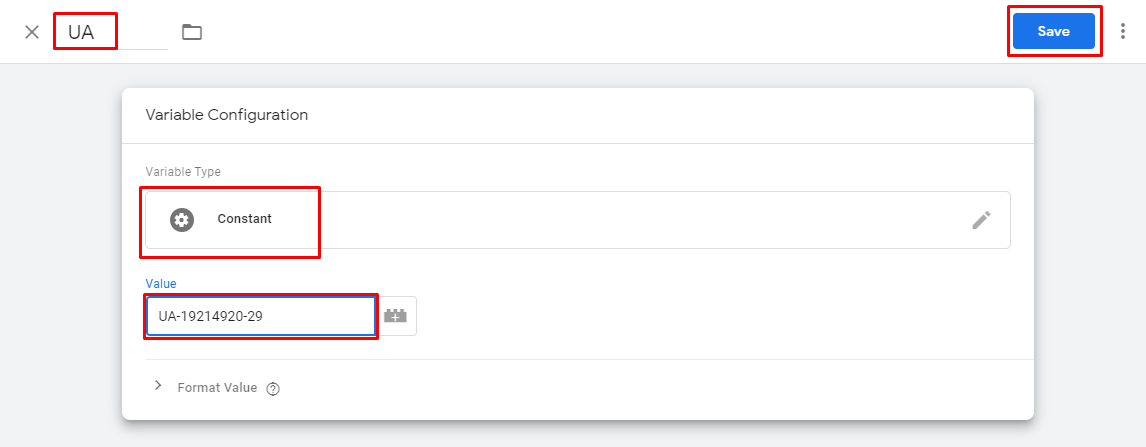
After that we give the name of the variable and select its type as "Constant", then we enter the identifier in the format UA-XXXXXX-X and click "Save":
Setting Google Tag Manager Variable
Then click "New" in the "Tags" section:
How to create a tag in Google Tag Manager
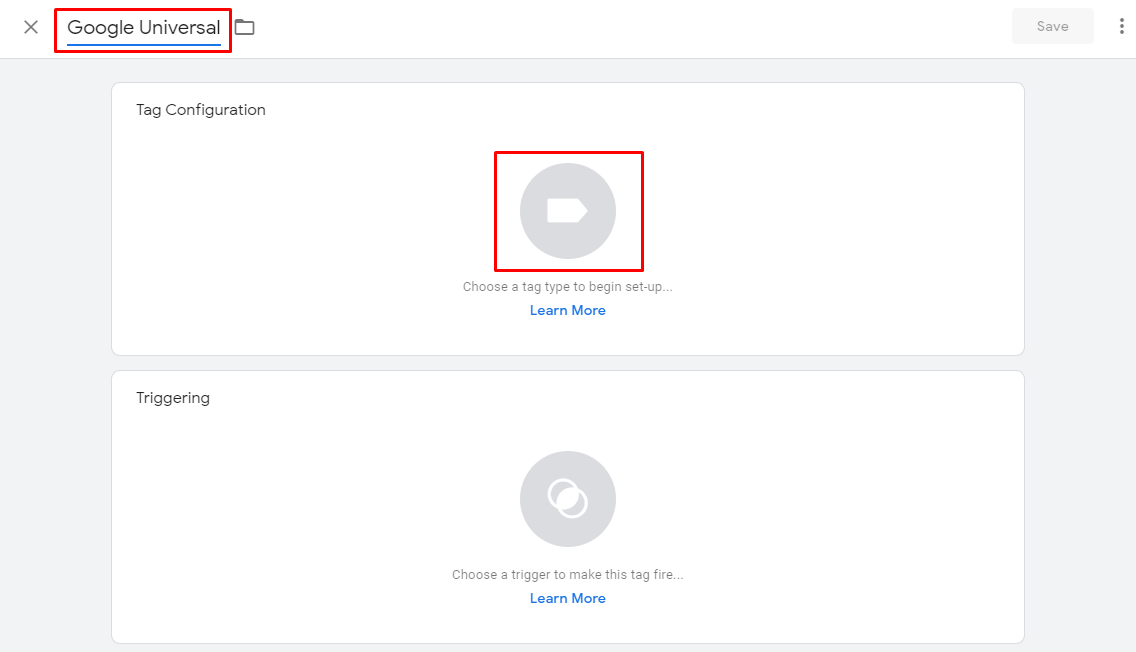
Type the appropriate tag name and choose a tag configuration:
Tag customization in Google Tag Manager
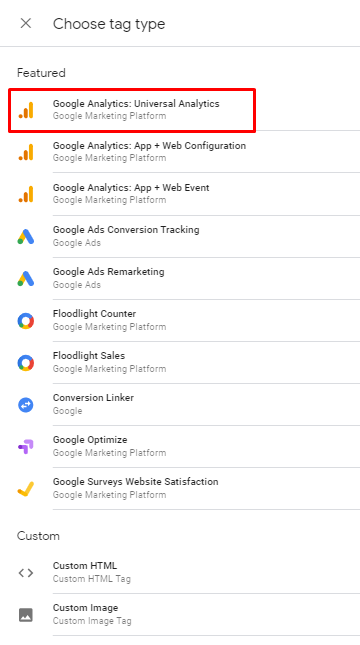
Choose a tag type:
Choosing a tag type in Google Tag Manager
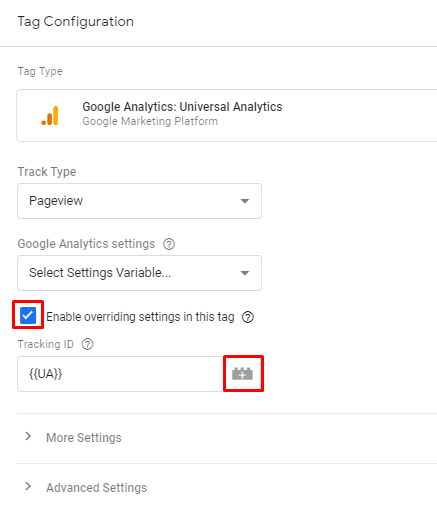
Then we change the configuration of the tag; we redefine the settings and select the previously created variable saved with the name "UA" as the tracking identifier:
GTM tag configuration
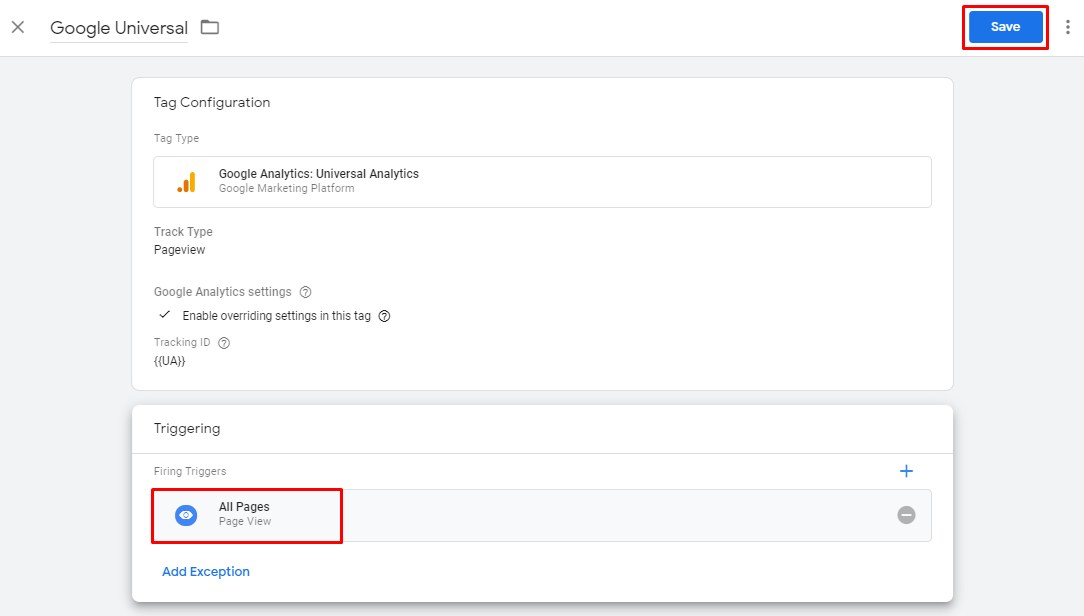
After that, we complete the setup; we select the trigger "All pages" as a condition for activating the tag to track views of all pages and click "Save":
Save Google Tag Manager Tag
To activate the tag, you must first click "Submit":
Site operator to search a site on Google
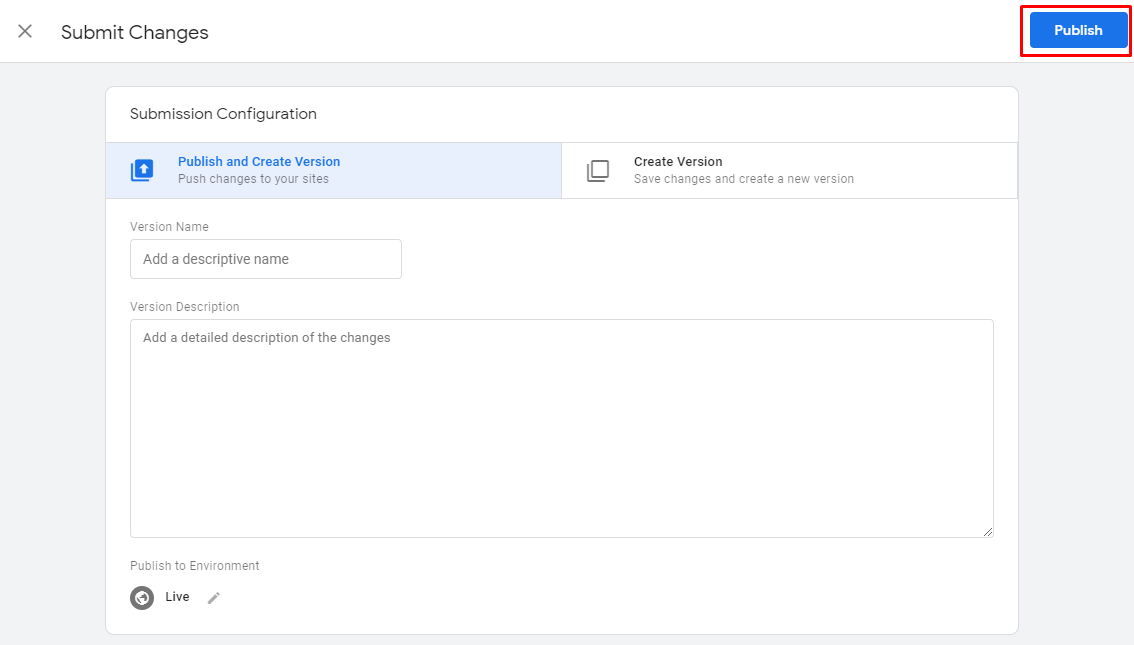
And after that, click "Publish":
Publish Google Tag Manager Tag

Configuring goals in Google Tag Manager

A website can have various goals, in addition to placing orders, for example, viewing contact information page, filling out forms, adding products to the basket, navigating to product pages in advertising blocks, etc. Let's consider setting goals by visiting an important page, for example, the "Stocks" section.

Create a new tag with the name "Promotion View" and the "Universal Analytics" type:
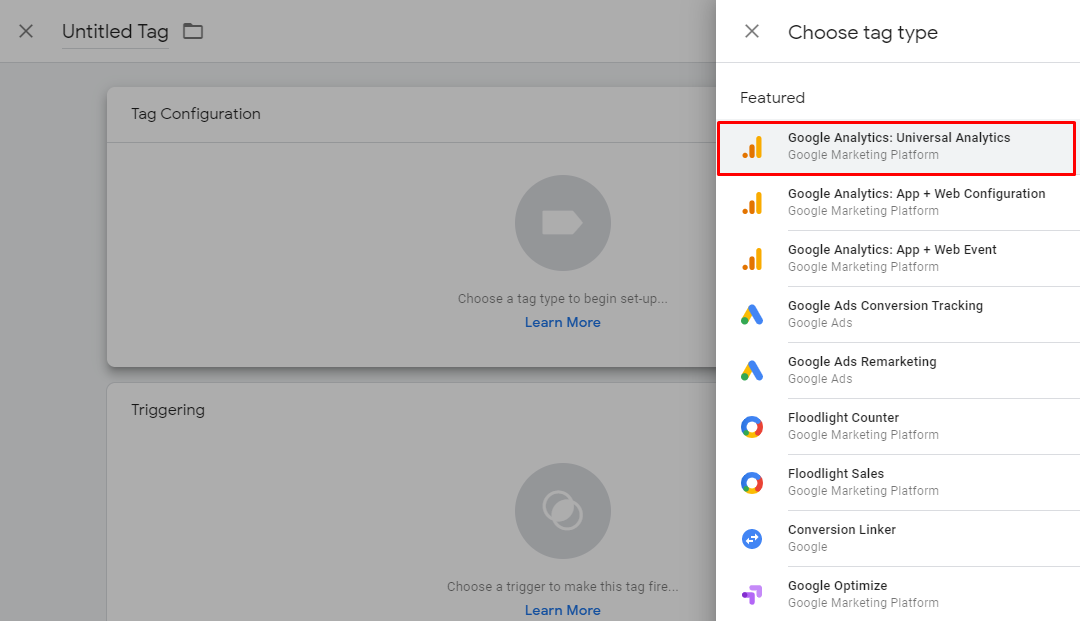
Universal Analytics in Google Tag Manager
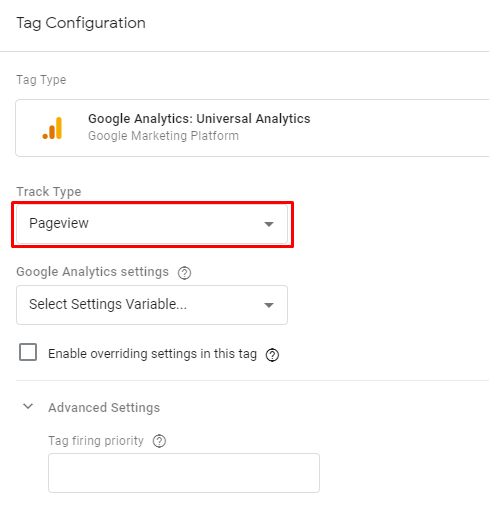
Choose the "Pageview" track type as the tag configuration:
Tracking Google Tag Manager Page Views
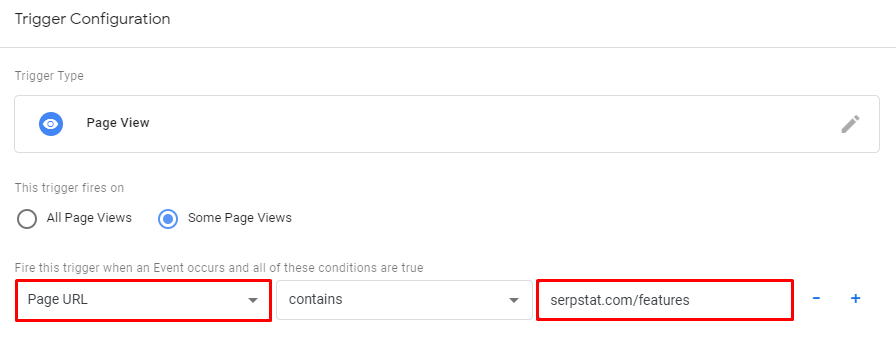
Then we specify the Google Analytics constant. After that, we add an activation trigger with the settings "Page Views" -> "Some Page Views" and specify the necessary URL:
Configure a Google Tag Manager trigger
After saving the changes and publishing the container, the data on visits to the promotion page will be added to the Google Analytics report.

Similar statistics can be obtained if you set this goal in Google Analytics in the "Settings" section:
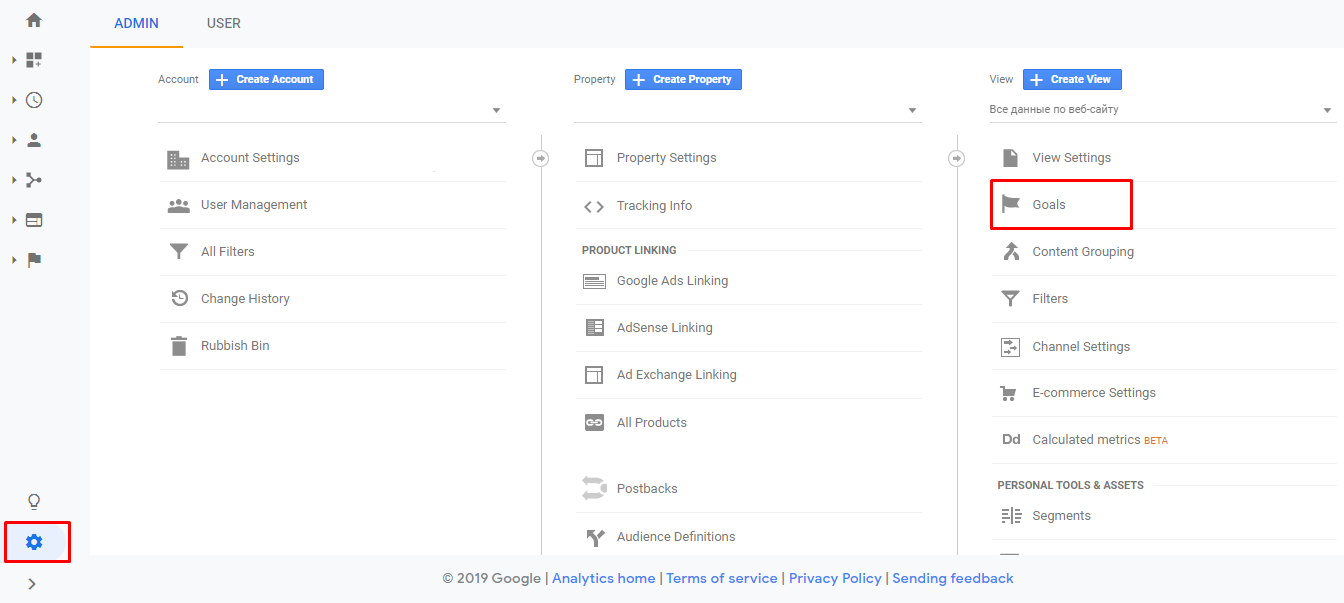
Google Analytics Goals
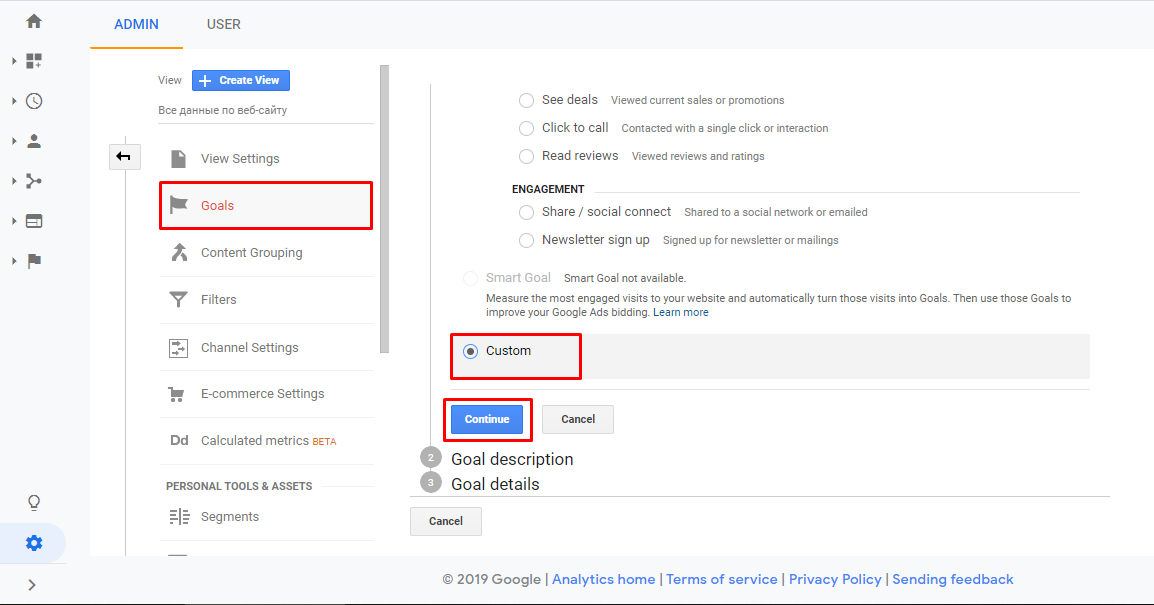
Choose the "Custom" goal type and press "Continue":
Custom Goal in Google Analytics
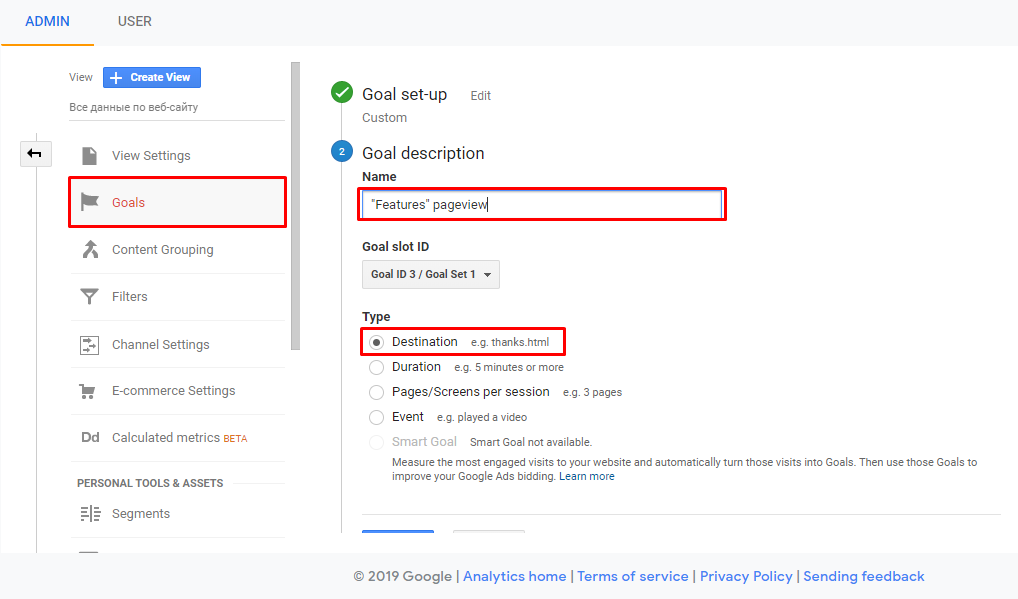
Then add the goal name and specify the "Destination" type:
Google Analytics Landing Page
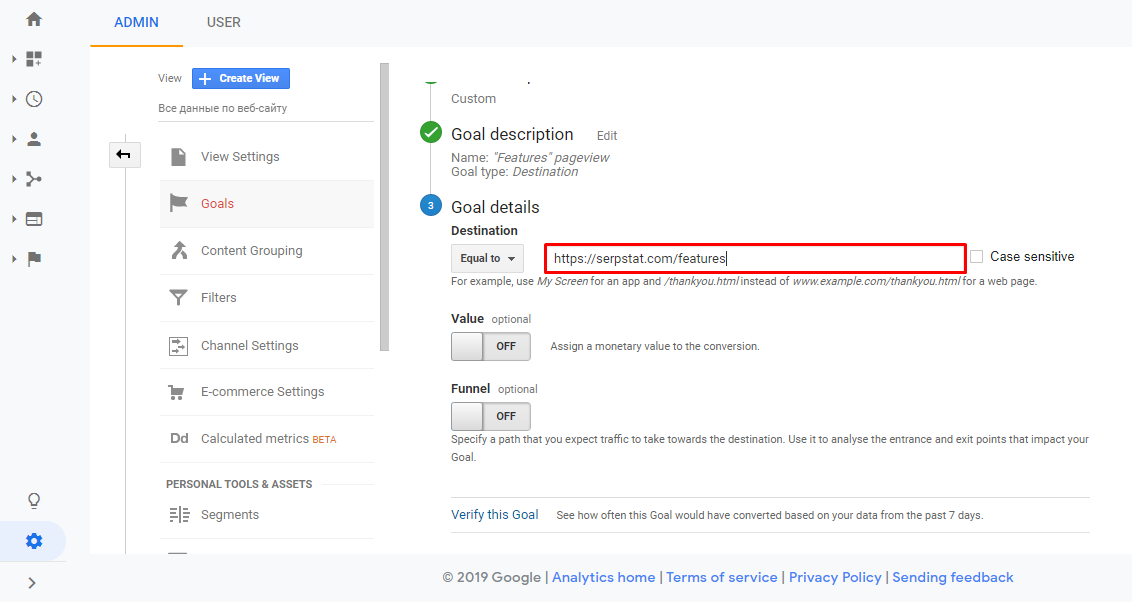
The last step is to specify the destination URL:
Analytics Goal Setting
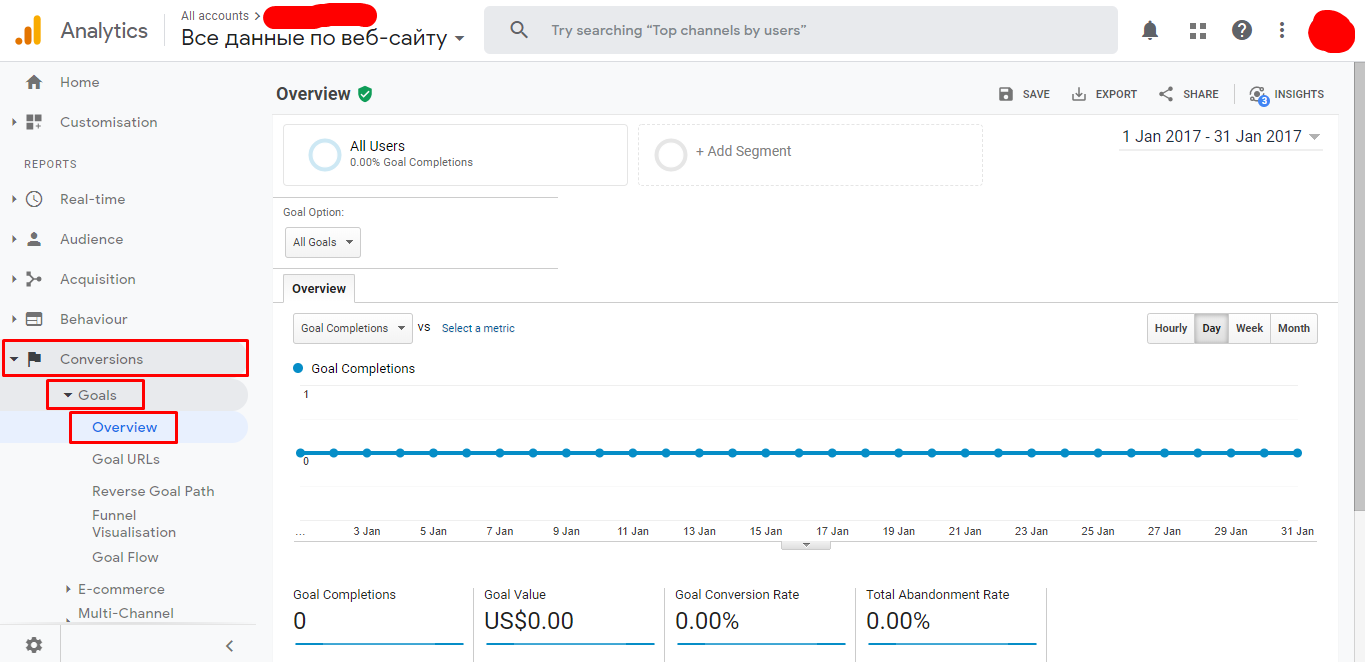
Data on all achieved goals in this property will be shown in the "Conversions" report:
Google Analytics conversion

Dynamic remarketing in Google Tag Manager

Dynamic remarketing allows you to show an advertisement with this product to a user who was previously interested in a particular product on the website or in a mobile application.

To configure dynamic remarketing, do the following:
1
Add a Google Ads remarketing tag to all pages of your resource. To do this, click "Add a new tag":
Add New Tag to GTM
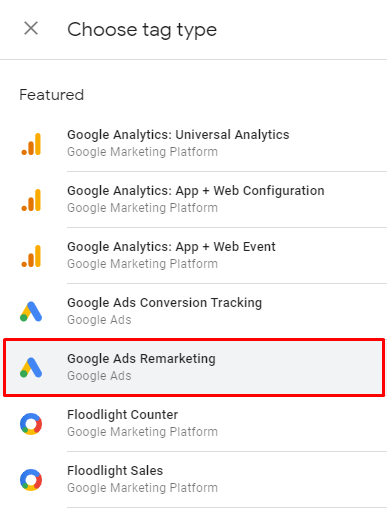
Choose "Google Ads Remarketing" as the tag configuration:
Google Ads Remarketing
2
Transfer special parameters to this tag which are dynamic values necessary to identify the product or service that a user is interested in. Typically, the technical implementation of this stage is provided by programmers in accordance with the terms of reference.
3
Configure the conditions for firing this tag — activation triggers. Each tag must have at least one trigger, otherwise, it will not be fired.
4
The selection is made in the "Triggers" section of the tag:
GTM tag triggers
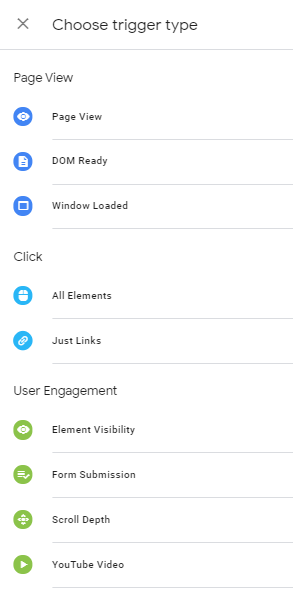
Here you can select one of the proposed firing conditions, for example, "Page Depth" or add a custom event:
Types of Google Tag Manager triggers
5
Test tags using preview mode. After checking, you can publish the container:
Publish Google Tag Manager container

Cross-domain tracking in Google Tag Manager

When tracking multiple domains, it's important to consider whether users are moving from one project to another. If there are such transitions, you need to configure the analytics so that only one visit is recorded. Otherwise, user accounting will be duplicated, and statistics will become incorrect.

A similar situation can occur when the online store and shopping cart are located in different domains. In order for a visit to the store, and then the basket, to be registered as a single session, you must link the domains.

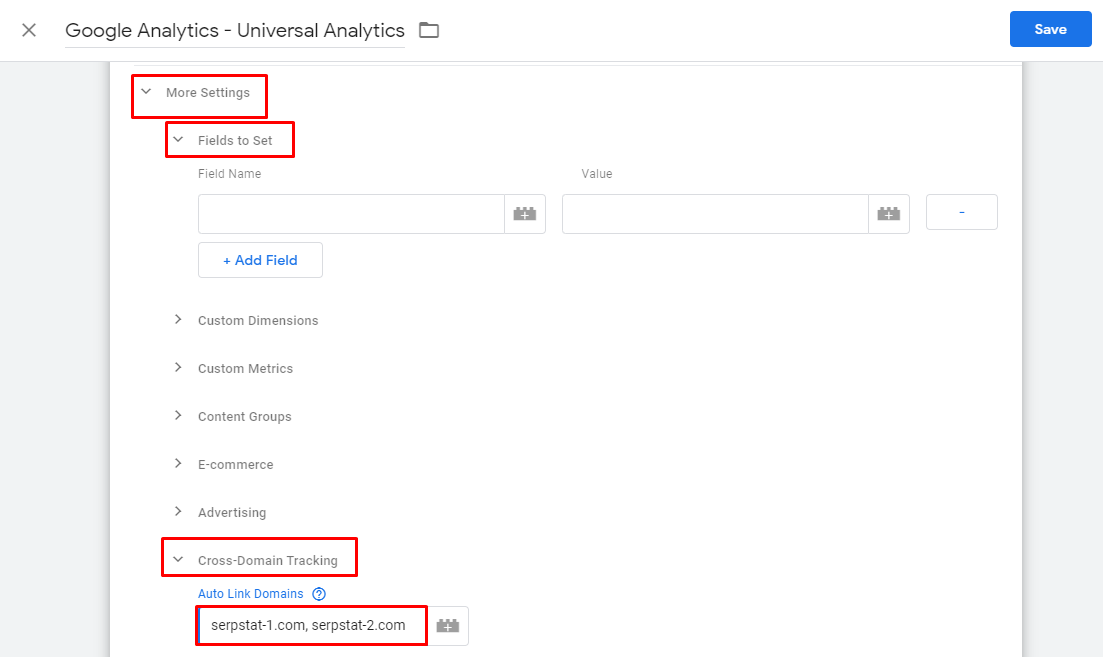
To configure the correct statistics collection, you need to select a tag with the configuration of Universal Analytics. Then select "Enable overriding settings in this tag", go to "Advanced settings" -> "Cross-domain tracking":
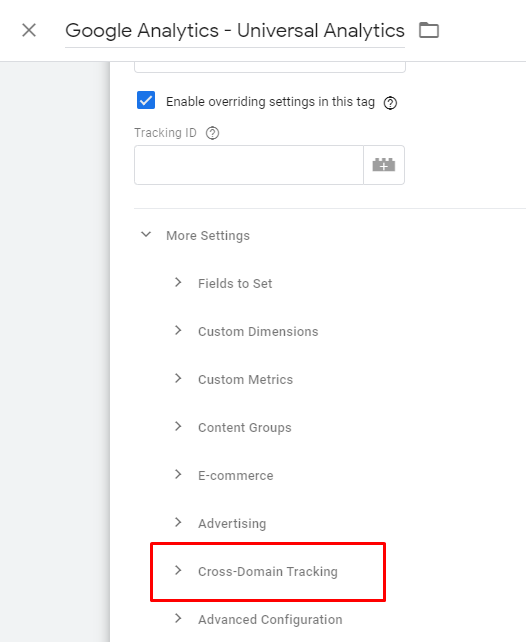
Cross-domain tracking of Google Analytics and Google Tag Manager
In this field, you need to enter a list of domains separated by a comma. In order to process incoming requests for linking from other domains, select in the "Advanced Settings" a subsection "Fields to set":
Linking Domains in Google Tag Manager
Set the field name as "allowLinker", and set the value to "true". After that, click "Save" and publish the container.

Conclusion

Google Tag Manager is a tool that allows you to fine-tune tracking certain actions of website visitors in any industry. Using GTM, you can easily and quickly install the following tags:

  • Google Universal Analytics tracking codes;
  • data collection for enhanced electronic commerce reports;
  • tracking visits to certain pages, making calls, conversions in Google Ads;
  • Google Ads remarketing;
  • other options for various tracking and optimization.

Speed up your search marketing growth with Serpstat!

Keyword and backlink opportunities, competitors' online strategy, daily rankings and SEO-related issues.

A pack of tools for reducing your time on SEO tasks.

Get free 7-day trial

Rate the article on a five-point scale

The article has already been rated by 3 people on average 5 out of 5
Found an error? Select it and press Ctrl + Enter to tell us

Discover More SEO Tools

Tools for Keywords

Keywords Research Tools – uncover untapped potential in your niche

Serpstat Features

SERP SEO Tool – the ultimate solution for website optimization

Keyword Difficulty Tool

Stay ahead of the competition and dominate your niche with our keywords difficulty tool

Check Page for SEO

On-page SEO checker – identify technical issues, optimize and drive more traffic to your website

Share this article with your friends

Are you sure?

Introducing Serpstat

Find out about the main features of the service in a convenient way for you!

Please send a request, and our specialist will offer you education options: a personal demonstration, a trial period, or materials for self-study and increasing expertise — everything for a comfortable start to work with Serpstat.

Name

Email

Phone

We are glad of your comment
I agree to Serpstat`s Privacy Policy.

Thank you, we have saved your new mailing settings.

Open support chat
mail pocket flipboard Messenger telegramm